Migrate Checkout.liquid Safely to Shopify Checkout Extensibility on Plus

Shopify checkout extensibility is the API-driven framework that replaced checkout.liquid, built on three primitives: Checkout UI extensions, Shopify Functions, and the CheckoutBranding API. Information, shipping, and payment step placements plus advanced branding controls require Shopify Plus. If you’re still running checkout.liquid customizations, inventory them now and map each one to its extensibility replacement before Shopify forces the issue.
TL;DR:
- Most migration budgets fail to account for extensive placement testing across different checkout layouts and configurations, increasing the risk of bugs after rollout.
- Transitioning from checkout.liquid to extensions involves mapping each customization to the appropriate primitive, such as UI extensions, Functions, or branding, which prevents rebuilding duplicates.
- Only basic branding changes like logo swaps and color updates can be managed through the checkout editor, while complex logic requires dedicated extensions, often with plan restrictions.
- Extensions run in a sandboxed environment with limited capabilities, so over-requesting features like network access can slow review processes and restrict deployment options.
- Conducting a thorough audit of all existing checkout customizations before building replacements is crucial to avoid costly double work and ensure a smooth, staged migration.
Table of Contents
- What Changed and Why: From Checkout.liquid to Shopify Checkout Extensibility
- Checkout UI Extensions, Shopify Functions, and Branding: Picking the Right Tool
- How Do You Build and Deploy a Checkout Extension?
- Why Do Checkout Placements Behave Differently on Different Layouts?
- Security, Sandboxing, and Plan Access Limits
- Your Migration Checklist for Moving Off Checkout.liquid
- How Quick To Impress Helps Plus Teams Migrate and Optimize Checkout
- The Migration Gets Rushed. That’s the Real Risk.
- Ready to Audit Your Checkout Before Checkout.liquid Breaks Something?
- Primary Docs and Reference Links Worth Bookmarking
- Sources
- FAQ
What Changed and Why: From Checkout.liquid to Shopify Checkout Extensibility
Checkout.liquid let developers inject arbitrary code directly into checkout templates. It worked, until a platform update broke half of it. Shopify replaced that model because file-based edits couldn’t be upgraded safely, sandboxed for security, or reviewed for performance impact at scale. Every custom script sat directly in the checkout flow with no isolation, which meant one bad snippet could tank conversion or expose sensitive data.
The checkout technologies overview frames the rationale plainly: extensions run in a sandboxed environment, ship through the app ecosystem, and survive platform upgrades because they never touch raw checkout markup. Merchants get stability. Developers get a defined contract instead of guesswork.
Not every legacy customization needs custom code, though. Some things now live inside the checkout and accounts editor with no development required, while others genuinely require a rebuilt extension:
- Simple field reordering, logo swaps, and color changes: handled in the editor or Shopify SEO Automation.
- Custom upsells, dynamic messaging, or conditional field logic: require a Checkout UI extension.
- Discount logic, shipping rule overrides, and cart validation: require a Shopify Function.
- Anything that manipulated the raw checkout DOM directly: has no direct equivalent and must be redesigned around the new API surface.
That last category is where most migration budgets blow up. Audit before you estimate.
Checkout UI Extensions, Shopify Functions, and Branding: Picking the Right Tool
Three primitives cover almost every checkout customization request, and picking the wrong one wastes a sprint. Here’s how they split.
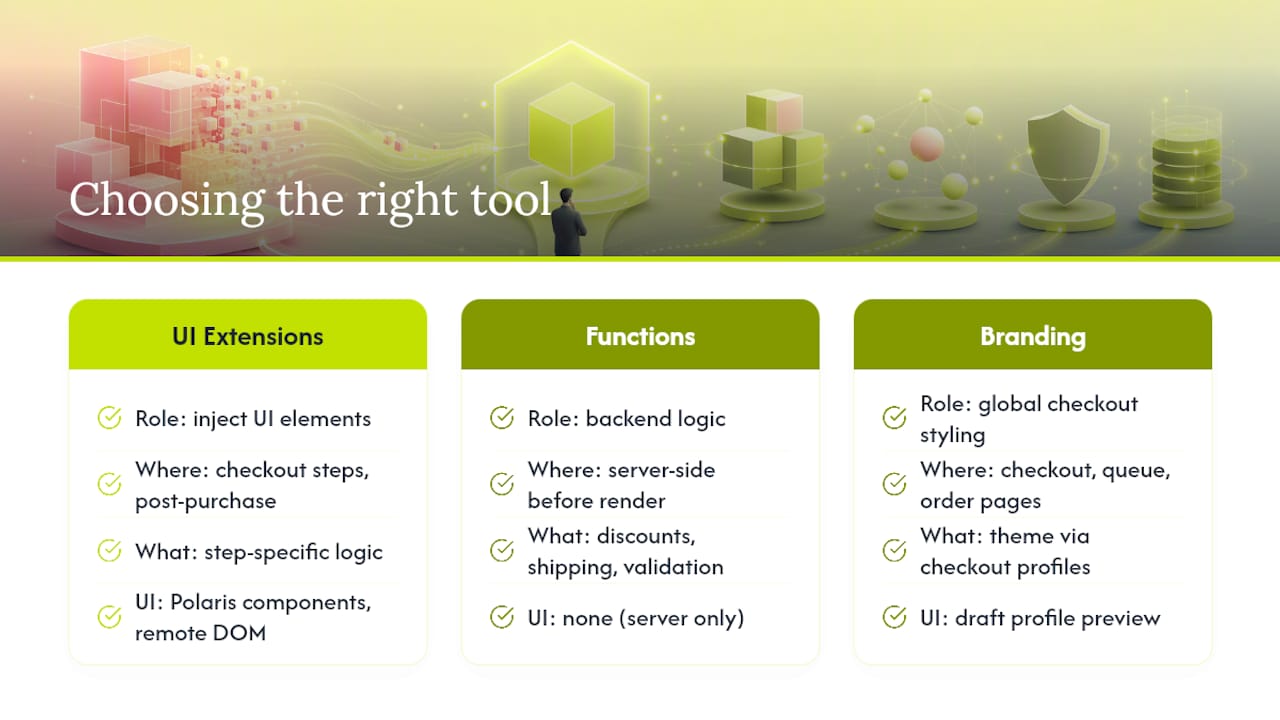
Checkout UI extensions inject custom interface elements and logic into specific checkout steps and the post-purchase page. They’re built from targets, target APIs, and Polaris web components, Shopify’s prebuilt UI building blocks rendered through a remote DOM. You don’t get raw HTML or CSS control. You compose of Shopify’s component library, which keeps checkout visually consistent across every merchant but limits how far you can push a custom design.
Shopify Functions handle backend logic: custom discounts, shipping rate manipulation, and cart validation rules. If the customization needs to run server-side before checkout renders, it belongs in a Function, not a UI extension, according to Shopify’s own technologies overview.
CheckoutBranding, part of the Checkout and Accounts Configuration API, applies global styling across checkout, the checkout queue, and order status pages through checkout profiles. Changes preview in draft profiles before you push them live.
Plan constraints matter here: information, shipping, and payment step extensions, plus advanced branding controls, are Shopify Plus exclusive. Thank you and order status page extensions work on non-Starter plans generally.
How Do You Build and Deploy a Checkout Extension?
Every extension starts the same way, regardless of what it does.
- Scaffold with Shopify CLI. Running the generate command creates a
shopify.extension.tomlconfig file and a templateCheckout.jsxwhere your extension code lives. - Configure the TOML. Set the
api_version, define themodulepath, declaretargets, and requestcapabilities(network access, buyer consent, block progress) explicitly. Metafield access also gets declared here if your extension reads custom data. - Run local dev and preview.
shopify app devspins up a tunnel and prints a checkout URL. Append a placement reference parameter to that URL to preview specific target placements without manually navigating checkout each time. - Deploy in stages. Build the extension, deploy through the CLI, and use app versioning to roll changes out to a limited audience before a full release.
The tunnel step trips people up more than anything else. Local dev typically routes through a temporary public URL, and if your extension calls an external API for capability checks, that URL needs to be reachable, not just your localhost.
Pro Tip: Keep a second terminal running shopify app info during development. It’s the fastest way to confirm which API version and extension targets are actually active when something renders differently than expected.
Why Do Checkout Placements Behave Differently on Different Layouts?
Two target types exist, and confusing them causes most placement bugs. Static targets render at a fixed spot in checkout that merchants cannot move. Block targets are repositionable through the checkout and accounts editor, which means the merchant, not you, decides where your extension ultimately sits.
That flexibility comes with a catch: placement behavior shifts between one-page and multi-page checkout. A block placed at a position like INFORMATION3 might render fine in a three-page checkout and simply not exist in a one-page layout. The same goes for placements tied to shipping steps when a merchant sells only digital products with no shipping step at all.
A few habits prevent most of the pain:
- Never assume surrounding markup or spacing. Your extension has to render coherently whether it sits next to three other blocks or alone.
- Test every supported placement in a dev store, not just the one your designer mocked up.
- Use the
default_placementfield in your TOML to recommend an initial position, then preview it live by appending a placement reference parameter to the checkout URL your CLI session prints. - Re-test after any merchant reorders blocks in the editor. What shipped correctly can silently break after a layout edit six months later.
The fastest way to catch a placement bug before a merchant does: load the checkout in both one-page and multi-page test stores side by side and watch what disappears.
Security, Sandboxing, and Plan Access Limits
Extensions run in a sandboxed remote DOM with no access to the real checkout DOM and no way to override component CSS directly, a deliberate constraint that keeps a rogue extension from breaking checkout for every merchant on the platform. Capability flags in your TOML control what an extension can actually do:
network_accesspermits outbound API calls, needed for anything that checks inventory or fraud signals in real time.collect_buyer_consentgoverns whether the extension can gather consent for SMS or marketing opt-ins.block_progresslets an extension pause checkout until a condition resolves, useful for age verification but risky if misused.api_accessscopes what backend data the extension can query.
Request only the capabilities you need. Over-requesting slows app review and raises questions during the submission process. Extension points tied to information, shipping, and payment steps remain Plus-only, and any extension touching protected customer data needs to justify that access explicitly during Shopify’s app review.
Your Migration Checklist for Moving Off Checkout.liquid
Treat this as a sequence, not a wish list.
- Inventory everything. List every checkout.liquid customization currently live, plus every page and step it touches.
- Map each item to its replacement. Assign it to a Checkout UI extension, a Shopify Function, CheckoutBranding, or a third-party app. Anything with no clean mapping needs a design conversation, not a coding sprint.
- Prototype the highest-risk items first. Scaffold minimal extensions for whatever touches discounts, shipping, or payment logic, since that’s where bugs cost real revenue. Test across every layout and placement reference before touching cosmetic items.
- Roll out in stages. Publish draft checkout profiles to a limited audience first, watch analytics and error logs closely, and keep a documented rollback plan for every extension you push to production.
Cosmetic branding changes are low risk and can move fast. Anything touching cart validation or discount logic deserves a staged rollout with a genuine rollback plan, not a Friday afternoon deploy.
How Quick To Impress Helps Plus Teams Migrate and Optimize Checkout
An embedded growth-engineering partner can audit existing checkout.liquid customizations, map them to UI extensions, Functions, or CheckoutBranding, build and test across layouts, and stay involved through rollout and post-launch experimentation.
The team’s enterprise commerce work covers exactly this kind of platform-level rebuild, and the same senior engineers who scope the migration are the ones who ship it. Typical engagement shapes run from a discovery audit through a focused migration sprint, then into an ongoing retainer for checkout experimentation once the extensions are live.
The Migration Gets Rushed. That’s the Real Risk.
Most teams treat checkout extensibility as a technical swap: pull the checkout.liquid code, rebuild it as an extension, ship it. That’s the easy 80%. The part that actually determines whether the migration succeeds is placement testing across every layout permutation a merchant might create, and almost nobody budgets time for it.
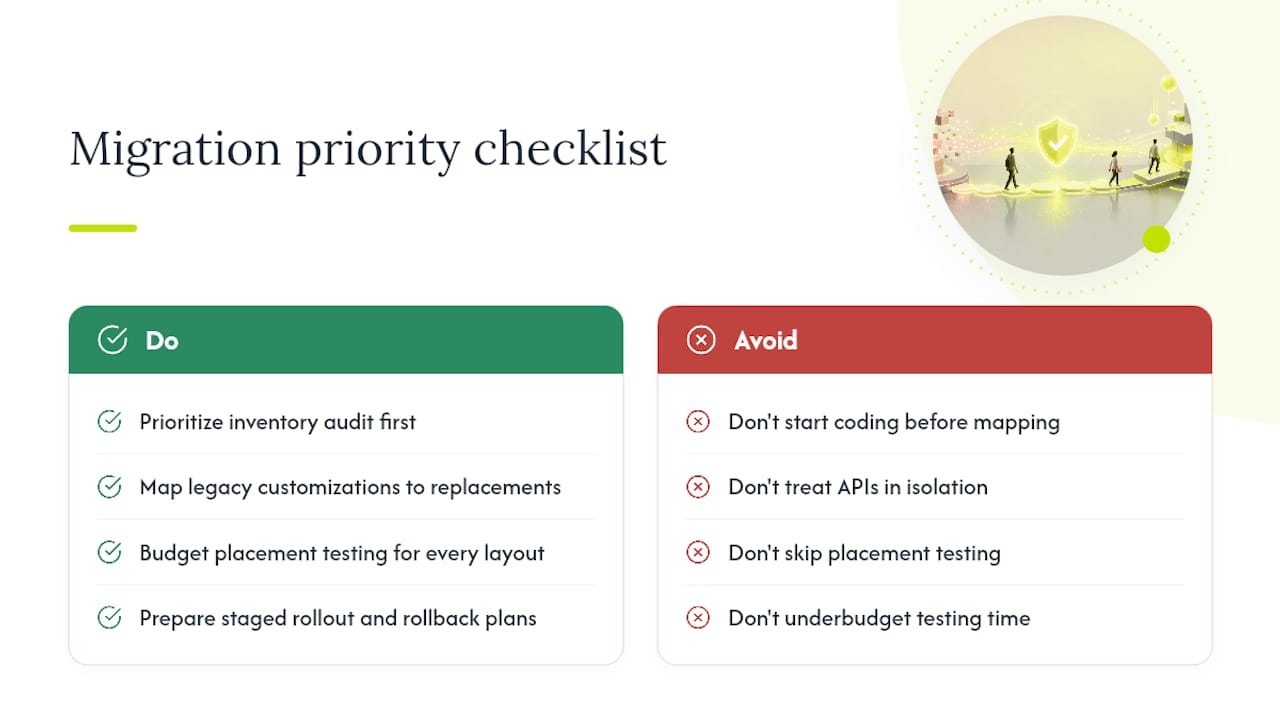
The conventional advice, mostly Shopify’s own docs, treats each API in isolation: here’s how UI extensions work, here’s how Functions work, here’s the branding API. Fair enough for reference material. But it undersells how much the target and placement decisions interact with layout, plan tier, and what other apps are already occupying checkout real estate on that store.
If you’re prioritizing anything first, prioritize the inventory audit over the build. Teams that start coding before they’ve mapped every legacy customization to its replacement primitive end up rebuilding twice. The technical migration itself, done properly with staged rollout and rollback plans, is the least risky part of this whole process. The unglamorous audit work at the front is what actually protects revenue.
— Service
Ready to Audit Your Checkout Before Checkout.liquid Breaks Something?
Quicktoimpress is the alternative to a traditional agency handoff for checkout extensibility migrations: one accountable team audits your checkout.liquid customizations, builds the replacement extensions, and stays through rollout instead of disappearing after a scoping call.
If you’re carrying legacy checkout code and no clear migration plan, that gap gets more expensive the longer it sits, especially with staged rollouts and app review timelines to account for. Quicktoimpress engagements run from a discovery audit through a focused migration sprint, with Core capacity, Growth capacity, and Scale capacity plans starting at $3,500 per month depending on scope. Browse the full capabilities overview to see how checkout work fits alongside revenue operations and CRO, then reach out to scope your audit.
Primary Docs and Reference Links Worth Bookmarking
- Checkout UI extensions for targets and web components.
- Checkout technologies overview for Functions vs. UI extensions.
- Checkout Extensibility rationale from Shopify’s partner blog.
Sources
FAQ
What Is Shopify Checkout Extensibility?
Shopify checkout extensibility is the API-driven framework, built on Checkout UI extensions, Shopify Functions, and the CheckoutBranding API, that replaced checkout.liquid for customizing checkout. It sandboxes custom code so upgrades don’t break merchant customizations.
Do I Need Shopify Plus to Customize Checkout?
Basic branding and thank-you page extensions work on non-Starter plans, but information, shipping, and payment step extensions along with advanced branding controls are restricted to Shopify Plus. Most deep checkout customization work assumes a Plus plan.
How Do I Test Checkout Extension Placements?
Append a placement reference parameter to the checkout URL your Shopify CLI dev session prints to preview specific target placements. Test every placement across both one-page and multi-page checkout layouts, since behavior and availability differ between them.
Can I Fully Restyle Checkout With Custom CSS?
No. Checkout UI extensions render through Polaris web components via Shopify’s remote DOM, and you cannot override component CSS directly. Global styling runs through the CheckoutBranding API and checkout profiles instead.
How Much Does a Checkout Extensibility Migration Cost?
Costs vary by how many checkout.liquid customizations need rebuilding and how complex the underlying logic is. Quicktoimpress’s engagement plans, Core capacity, Growth capacity, and Scale capacity, start at $3,500 per month depending on project scope.