Enable Shop Pay First: Shopify Checkout Optimization for 2026

The single highest-impact move you can make to your Shopify checkout is enabling and prominently surfacing Shop Pay and other accelerated wallets. Shop Pay checkouts complete at roughly 1.72 times the rate of standard guest checkouts, and shoppers who use it repurchase about 57% more often within 90 days. That single toggle beats almost anything else you could spend a week building.
Before you touch anything else, run through this five-minute checklist:
- Turn on Shop Pay, Apple Pay, and Google Pay in your payment settings.
- Enable guest checkout so account creation never blocks a sale.
- Delete unnecessary form fields (company name, address line 2, optional phone).
- Surface shipping costs before the payment step, not after.
- Confirm marketing consent boxes start unchecked.
Small toggles like these routinely lift conversion between 5% and 15%. Give the changes 30 days before judging results, and watch checkout completion rate specifically, not your blended site-wide conversion number, which hides what’s actually happening at the register.
Key Takeaways
Shopify checkout optimization succeeds when accelerated wallets like Shop Pay are enabled and surfaced first, since that single change drives both higher completion and repurchase rates.
| Point | Details |
|---|---|
| Enable Shop Pay first | It completes at roughly 1.72x the rate of guest checkout and drives 57% higher repurchase within 90 days. |
| Prune forms aggressively | Making phone optional and removing unnecessary fields lifts conversion 5 to 15% with minutal effort. |
| Show costs before payment | Revealing shipping and taxes early prevents last-step abandonment and avoids regulatory risk around hidden fees. |
| Test one variable at a time | Establish a two-week baseline, change a single element, and measure stage-level drop-off before rolling out. |
| Invest in Extensibility later | Quicktoimpress helps Shopify Plus stores build Checkout Extensibility once native settings are exhausted, targeting the 12 to 18% lift fully deployed stores report. |
Table of Contents
- Why Shopify Checkout Optimization Moves Real Revenue
- How Do You Reduce Friction in Shopify Checkout?
- Which Payment Methods Should You Prioritize?
- What Trust Signals Actually Reduce Checkout Hesitation?
- Shipping Strategies That Cut Abandonment and Lift AOV
- Designing Checkout for Mobile-First Shoppers
- How Should You Recover Abandoned Shopify Carts?
- What Should You Measure When Testing Checkout Changes?
- Your Shopify Checkout Optimization Checklist
- Common Checkout Mistakes and Warning Signs
- What Does Shop Pay Actually Deliver in Practice?
- Building and Testing Shopify Checkout Upsells
- Compliance and Accessibility in Shopify Checkout
- Customizing Shopify Checkout With Liquid and Extensibility
- How Quick To Impress Approaches Checkout Optimization Projects
- Get a Checkout Audit Built Around Your Actual Drop-Off Points
- Frequently Asked Questions About Shopify Checkout Optimization
- Sources
Why Shopify Checkout Optimization Moves Real Revenue
Checkout completion rate measures something narrower and more useful than your overall conversion rate: it tells you what percentage of shoppers who actually reach checkout finish the purchase. Site-wide conversion mixes in everyone who bounced off a product page and never intended to buy. Checkout completion isolates the moment where money is already in the cart and something still goes wrong.
Benchmarks vary sharply by plan and payment mix. Stores running mostly credit-card checkouts tend to land between 45% and 55% completion, while stores where Shop Pay adoption is high often see completion in the 60% to 70%+ range. Shopify Plus merchants running an optimized, extensible checkout can push even higher.
| KPI | What it tells you |
|---|---|
| Checkout reached → purchase | Your true completion rate, isolated from top-of-funnel noise |
| Stage-level drop-off | Which specific step (shipping, payment, review) bleeds customers |
| Payment method mix | Whether shoppers are finding and using accelerated wallets |
| Shop Pay adoption rate | How much of your traffic is getting the fastest, highest-converting path |
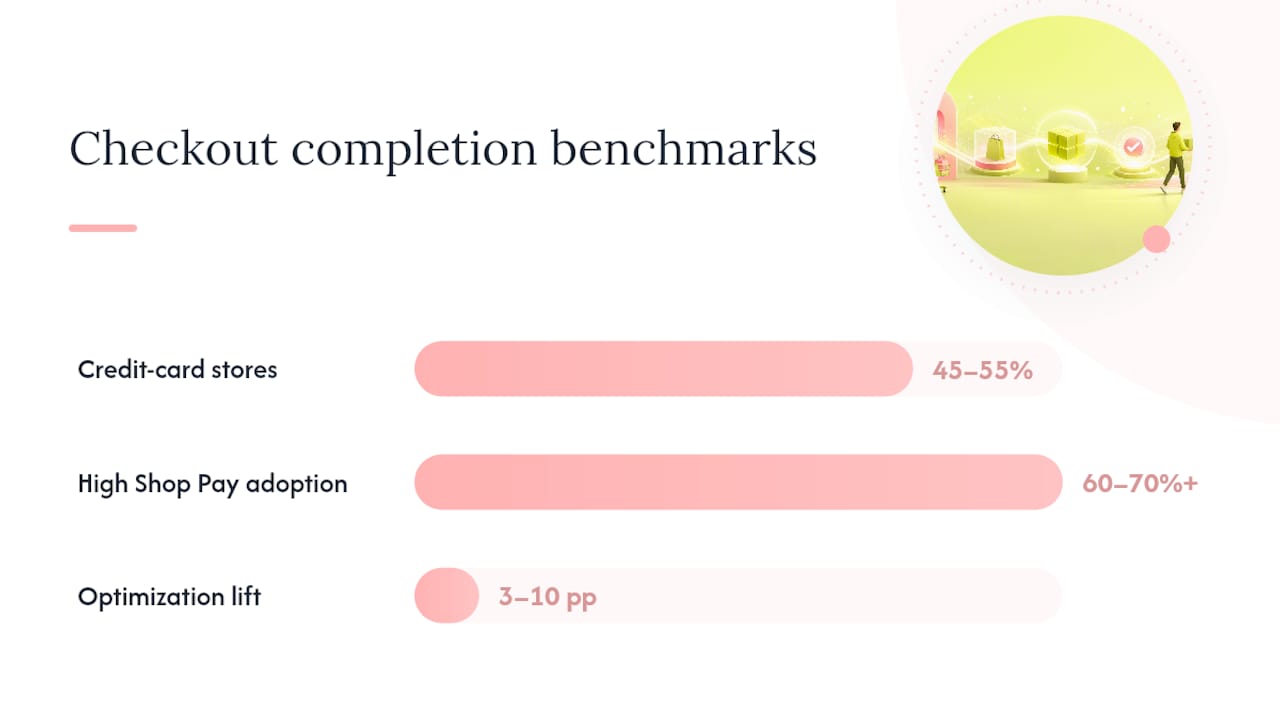
A 3 to 10 percentage-point lift in checkout completion on a store doing $50,000 a month in checkout-stage traffic isn’t a rounding error. It’s often the difference between hitting a quarterly target and missing it, without spending a dollar on new traffic.
How Do You Reduce Friction in Shopify Checkout?
Every field you ask a shopper to fill in is a chance for them to stop, get distracted, or bail. Baymard Institute’s research on cart abandonment consistently points to long or confusing checkout processes as one of the top reasons people leave without buying. The fix is mostly subtraction, not addition.
Start with a form audit:
- Make phone number optional unless your carrier requires it for delivery.
- Hide the company name field for anything that isn’t clearly B2B.
- Drop address line 2 into an expandable “add apartment/suite” link instead of a permanent field.
- Leave marketing consent unchecked by default.
- Test removing order notes from the default view; add it back only if support tickets increase.
Express payment buttons need real estate, not an afterthought placement. Shopify’s own testing on one-page checkout layouts showed a 3.5% lift in conversion, and that number climbs when dynamic checkout buttons (Shop Pay, PayPal, Apple Pay) appear on the product page and cart page, not just at final checkout. Shoppers should never have to hunt for the fast path.
Address autocomplete, powered by Google Places or Shopify’s native autofill, cuts typing dramatically on mobile, where a fat-fingered zip code is a common reason for a failed order. Pair it with mobile keyboard types that match the field: numeric pads for phone and postal code, email keyboards for email.

Decide early whether you need a true single-page checkout. Shopify’s default checkout already runs as a streamlined flow, but Shopify Plus merchants can go further with Checkout Extensibility, building custom single-page layouts with UI Extensions.
Pro Tip: Before you redesign anything, pull ten real checkout sessions from your analytics and watch where people actually stall. One clogged step almost always explains more lost revenue than a dozen theoretical fixes.
Which Payment Methods Should You Prioritize?
Sequence matters as much as selection. Put Shop Pay first, since it consistently drives the highest completion rates and repurchase lift of any payment option on the platform. Behind it:
- Apple Pay and Google Pay for shoppers who want a fast, wallet-based tap without typing a card number.
- PayPal for customers who trust it more than entering card details directly on your site.
- Buy now, pay later options like Klarna, Afterpay, or Affirm, especially for higher-ticket items where splitting payments removes a real objection.
Accelerated wallets work because they eliminate the slowest part of checkout: manual data entry. A shopper with Shop Pay saved can complete a purchase in a couple of taps instead of typing out a card number, expiration date, billing address, and shipping address by hand. That speed is exactly why completion and repurchase rates both move.
In your Shopify admin, go to Settings → Payments to activate each wallet, then confirm dynamic checkout buttons are switched on for product and cart pages so they show up before the customer even reaches checkout.
BNPL is worth testing if your average order value sits above roughly $75 and your customers skew toward younger or credit-conscious demographics. Run it as a genuine test: track whether it increases AOV enough to offset the processing fee, rather than assuming it will.
Pro Tip: Run a simple sequencing experiment: swap the order of payment buttons for two weeks and compare completion rates by device. The “obvious” order for desktop shoppers isn’t always what performs best on mobile.
What Trust Signals Actually Reduce Checkout Hesitation?
The payment step is where doubt peaks, right when a shopper is about to hand over their card details. A one-line summary near the place-order button, something concrete like “Free returns within a reasonable timeframe” instead of a vague “satisfaction guaranteed,” can reduce hesitation by addressing a specific fear.
For newer or lower-recognition brands, inline trust badges and short review snippets placed directly in the checkout flow do real work. Shoppers who don’t recognize your name yet need a faster trust shortcut than your homepage can provide at that moment.
The bigger trust killer is surprise. If taxes or shipping costs appear for the first time on the final payment screen, you’ve just triggered exactly the hesitation you spent the whole checkout flow trying to avoid. This isn’t just a UX preference: regulators including several state attorneys general treat hidden fees revealed late in a purchase flow as a consumer protection issue, not just a bad experience.
Practical trust elements you can add without a developer:
- A one-line shipping and returns summary above the payment button.
- A small security badge near the card entry field.
- A short, specific guarantee statement instead of generic marketing copy.
Shopify Plus merchants can add these through Checkout Extensibility blocks; other merchants can often achieve the same result through the checkout editor’s built-in content blocks.
Pro Tip: Add one trust element at a time and measure the specific checkout stage it should affect. Stacking three changes at once means you’ll never know which one actually moved the needle.
Shipping Strategies That Cut Abandonment and Lift AOV
Nothing kills a checkout faster than an unexpected shipping charge showing up after the customer thought they knew the total. Show real shipping costs as early as the cart page, or give a reliable estimate based on location, rather than leaving the field blank until the final step.

A free-shipping threshold paired with a visible progress bar in the cart (“Add $12 more for free shipping”) turns a cost objection into an incentive to spend more. It’s one of the few tactics that reduces abandonment and raises average order value at the same time.
Shipping protection add-ons, typically priced between $1 and $3, work well as low-friction upsells because the margin is close to pure profit and most customers barely notice the line item.
How you calculate shipping matters, too:
- Flat rate works best for stores with consistent product weights and sizes.
- Carrier-calculated rates fit businesses shipping heavy, oversized, or highly variable items.
- Table-rate pricing suits stores with a handful of predictable shipping tiers based on order value or weight.
Pro Tip: Add a $1 to $3 shipping protection option and measure incremental revenue over two weeks before deciding whether to keep it. The test costs you nothing and the data settles the argument fast.
Designing Checkout for Mobile-First Shoppers
Mobile traffic makes up roughly seven out of every ten Shopify orders, which means a checkout that works fine on desktop but fights the thumb on a phone is quietly costing you sales every day.
- Stack every field in a single column; side-by-side fields force awkward zooming on small screens.
- Put express-checkout buttons (Shop Pay, Apple Pay, Google Pay) at the very top of the page, above manual entry fields.
- Use large tappable buttons, at least 44 pixels, so a thumb doesn’t miss and hit the wrong field.
- Trigger the correct keyboard automatically: numeric for phone and zip code, email format for email address.
A visible progress indicator (Step 1 of 3, for example) matters more on mobile than desktop because small screens make shoppers feel less certain how much is left. Test the whole flow on a real phone over a throttled connection, not just Wi-Fi in your office, since a slow-loading payment button is often where mobile shoppers quietly give up.
How Should You Recover Abandoned Shopify Carts?
A proven recovery cadence for most stores:
- First email at the 1 hour mark, while the product is still fresh in the shopper’s mind.
- Second email at 24 hours, ideally with a slightly different angle (reviews, urgency, or a reminder of what’s in the cart).
- Third email at 72 hours, often the last one worth sending unless you’re layering in SMS for opted-in shoppers.
Segment your recovery flows instead of treating every abandoner the same. High-AOV cart abandoners deserve a different message than someone who left a $20 item, and shoppers who’ve responded to coupons before behave differently than those who never have. Mobile abandoners, in particular, often left simply because of friction rather than price hesitation.
Use on-site exit-intent offers sparingly, if at all, during checkout itself. A pop-up discount at the exact moment someone’s trying to pay can feel like it’s training shoppers to hesitate on purpose to earn a discount later. Off-site recovery sequences, sent after the abandonment, tend to perform better without teaching that habit.
Pro Tip: *Track recoveries by cohort, not just in aggregate.
What Should You Measure When Testing Checkout Changes?
Six numbers matter more than everything else combined: checkout reached to purchase rate, stage-level conversion at each step, payment method mix, Shop Pay adoption percentage, average order value, and repurchase rate within 90 days.
Before changing anything, establish a clean baseline. Measure for at least two full weeks to smooth out day-of-week and payday effects, then change one variable at a time. Testing a new Shop Pay placement and a new shipping threshold in the same week means you’ll never know which change actually caused the result.
- Set a two-week baseline window before making any change.
- Change a single variable (button placement, field removal, threshold amount).
- Run the test for at least two weeks or until you have enough transactions to trust the difference.
- Roll out the winning version to 100% of traffic and set a 90-day repurchase check as a secondary signal.
Pro Tip: Don’t rely on admin dashboards alone. Watching real session recordings through Shopify Analytics, GA4, or a session-level tool shows you where people hesitate in a way that summary numbers never will. A growth platforms build that includes proper event tracking makes this kind of analysis far less painful to maintain long term.
Your Shopify Checkout Optimization Checklist
Start in Settings → Payments and turn on Shop Pay, Apple Pay, Google Pay, and PayPal if you haven’t already. Then head to Settings → Checkout and set customer accounts to optional, make phone number optional in form settings, and confirm marketing consent checkboxes are unchecked by default.
Shipping and tax deserve a second look, too:
- Confirm your shipping rates reflect real carrier costs, not outdated flat estimates.
- Set a free-shipping threshold if your margins support one.
- Write clear, specific shipping policy copy instead of a generic disclaimer.
Most of these are native Shopify settings and don’t need an app. Reach for a specialized checkout app when you need something the platform doesn’t natively support, like advanced upsell logic. Reach for Shopify Plus and Checkout Extensibility when you need custom UI blocks, custom validation logic through Functions, or a fully rebuilt single-page layout that the standard editor can’t produce.
Pro Tip: Before calling a project done, place a real order on your own store with a real card on your own phone. Screenshots and staging environments hide problems that only show up on an actual mobile connection.
Common Checkout Mistakes and Warning Signs
A handful of mistakes show up on almost every underperforming Shopify store: forcing account creation before checkout, burying express payment buttons below the fold, revealing shipping costs only at the final step, requiring fields that add no real value, and pushing aggressive upsells inside checkout itself instead of before it.
Watch for these red flags:
- Checkout completion rate sitting five or more points below your plan’s typical median.
- One specific step (often shipping or payment) showing a disproportionate drop-off compared to the rest of the flow.
- Low Shop Pay adoption even though it’s enabled, which usually means poor placement rather than customer disinterest.
Each of these has a one-line fix: make accounts optional, move express buttons above manual fields, show shipping costs in the cart, cut unnecessary fields, and move upsells to the cart page instead of checkout.
What Does Shop Pay Actually Deliver in Practice?
Shop Pay isn’t a marginal improvement, it’s the biggest single lever available on the platform. Checkouts using it complete at about 1.72 times the rate of standard guest checkout, and buyers who use it once tend to come back, repurchasing roughly 57% more within 90 days than shoppers who don’t.
A realistic prioritization for most stores:
- Immediate (this week): enable Shop Pay, Apple Pay, Google Pay, and guest checkout.
- Short term (next 30 days): trim form fields, add shipping transparency, and fix the worst drop-off step you find in session recordings.
- Medium term (30 to 90 days): invest in Checkout Extensibility if you’re on Shopify Plus, since stores that fully deploy it report a 12 to 18% lift in completed purchase rate compared to their baseline.
A typical mid-market store following this order sees the fastest gains in the first two to four weeks from the free toggles alone, with the larger Extensibility investment paying off over the following two months as custom blocks and Functions get built and tested.
Building and Testing Shopify Checkout Upsells
Cross-sells belong before checkout, not inside it. The cart page and post-add-to-cart drawer are the right places for “customers also bought” prompts, since Shopify’s checkout is intentionally streamlined and heavy upsell logic there tends to add friction exactly where you’re trying to remove it.
Post-purchase upsells, offered on the thank-you page after payment is already confirmed, are the safer place to test additional offers. The sale is locked in, so there’s no risk of an upsell prompt causing someone to abandon a purchase they were about to complete.
When you do test upsells near checkout, keep them narrow: a single relevant add-on tied to what’s already in the cart performs better than a generic list of unrelated products. Track two numbers specifically, attach rate (how many customers accept the upsell) and its effect on overall checkout completion, since an upsell that boosts AOV but tanks completion rate is a net loss. Shopify Plus merchants can build more sophisticated upsell logic directly into the checkout using Functions, but that’s a case where testing on a small percentage of traffic first is worth the extra setup time.
Compliance and Accessibility in Shopify Checkout
Checkout is a legal surface, not just a design one. Shopify’s checkout meets baseline PCI DSS requirements for payment handling automatically, which takes a significant compliance burden off individual merchants. Where merchants still carry responsibility is accuracy: displaying correct taxes, honoring stated shipping costs, and avoiding fees that appear for the first time at the final step, an area regulators have flagged directly.
Accessibility deserves the same attention. Screen reader compatibility, sufficient color contrast on buttons and error messages, and keyboard-only navigation support all affect real customers, and increasingly they affect legal exposure as accessibility litigation around ecommerce checkouts has grown. Shopify’s native checkout includes reasonable accessibility defaults, but heavily customized checkouts, especially ones built with custom Liquid or Extensibility blocks, can accidentally break screen reader flow or keyboard tabbing if accessibility testing isn’t part of the build process.
Run a basic accessibility pass whenever you customize checkout: tab through the entire flow without a mouse, check that error messages are announced clearly, and confirm color isn’t the only signal used to flag a required field.
Customizing Shopify Checkout With Liquid and Extensibility
Direct checkout.liquid customization is no longer the supported path on Shopify. Checkout Extensibility, built on UI Extensions and Functions, replaced it, and it’s now the only way Shopify Plus merchants can build custom checkout experiences that survive platform updates.
UI Extensions let you add custom content blocks, banners, or fields at defined points in the checkout flow, things like a custom trust badge, a loyalty points display, or a gift message field. Functions handle backend logic changes, like custom shipping rate logic, payment method customization, or discount validation rules that go beyond what native settings support.
The practical tradeoff is development time versus native settings. A native toggle takes minutes. A custom Extensibility build takes real engineering time, whether in house or through a partner, and needs proper testing before launch since a poorly built custom checkout can underperform Shopify’s optimized defaults. Reserve custom Liquid and Extensibility work for changes that native settings genuinely can’t achieve, not as a default first move.
How Quick To Impress Approaches Checkout Optimization Projects
Our approach to checkout work follows the same order this article does: audit first, ship the quick wins, then build toward extensibility once the fast fixes are exhausted. Guessing at fixes before you’ve watched real sessions almost always wastes engineering time on the wrong problem.
A typical engagement runs in phases: a one to two week audit against session data and benchmark KPIs, two to four weeks implementing quick wins like wallet placement and form pruning, then a two to eight week Checkout Extensibility build for stores on Shopify Plus that need custom logic native settings can’t provide. Each phase ends with a measured before-and-after comparison, not a guess about impact.
Get a Checkout Audit Built Around Your Actual Drop-Off Points
Most Shopify stores can find their quick wins in a spreadsheet. What’s harder is knowing which of the dozen possible fixes will actually move your specific numbers, and building the Checkout Extensibility work correctly once you’ve outgrown the easy toggles. Quicktoimpress is the alternative to guessing your way through checkout settings one at a time: we pair a real funnel audit with the engineering capacity to build and test the fix, so you’re not left with a list of recommendations and no one to implement them.
A typical engagement starts with a checkout audit against your session data and benchmark KPIs, then moves into implementation, whether that’s native settings, a specialized app, or a full Checkout Extensibility build for Shopify Plus stores. If your store handles complex shipping, multiple locations, or a technical stack beyond checkout alone, our enterprise commerce team has built exactly this kind of work before. Visit Quicktoimpress to start with an audit and get a prioritized plan built around where your checkout is actually losing sales.
Frequently Asked Questions About Shopify Checkout Optimization
What is the fastest way to start Shopify checkout optimization? Enable Shop Pay, Apple Pay, and Google Pay in Settings → Payments, then turn on guest checkout. These changes take under ten minutes and typically produce the largest immediate lift of anything on this list.
How much can Shopify checkout optimization actually improve conversion? Small configuration changes routinely lift conversion 5 to 15%, while stores that fully deploy Checkout Extensibility report 12 to 18% lift in completed purchase rate against their baseline.
Does one-page checkout always outperform multi-step checkout? Not universally, but Shopify’s own testing found a 3.5% lift from one-page layout changes. Whether it’s the right move for your store depends on how many fields you can genuinely eliminate first.
Do I need Shopify Plus to optimize checkout? No. Native settings, Shop Pay, guest checkout, form pruning, and shipping transparency, are available on every plan. Shopify Plus is only necessary for custom UI Extensions and Functions through Checkout Extensibility.
How should I measure Shopify cart abandonment solutions? Track checkout completion rate specifically, not site-wide conversion, and segment abandoned-cart recovery performance by cohort (high-AOV versus low-AOV, mobile versus desktop) rather than looking at blanket recovery rates alone.
Sources
- Why Checkout Conversion Is Your Growth Opportunity in the AI Era (2026) - Shopify New Zealand
- The Complete Guide to Optimizing Your Shopify Checkout in 2026 – D2C Times
- Shopify Checkout Conversion Rates: A 2026 Comparison by Plan, Industry, and Device